Collecting customer card payments
Note
Overview
Search for Offers
Select Offer
Create PaymentIntent
Collect Payment
Confirm PaymentIntent
Create Order
Inspect Collected Payments and Markups
Note
Requirements
Note
Create PaymentIntent
PaymentIntent is a resource that will be used to represent and record the process of collecting a payment from your customer. We recommend that you create exactly one PaymentIntent for each offer your customer wants to book.PaymentIntent. You should use the Create a Payment Intent endpoint to do this in your back-end server.Caution
Request
Shell
curl -X POST --compressed "https://api.duffel.com/payments/payment_intents"-H "Accept-Encoding: gzip"-H "Accept: application/json"-H "Content-Type: application/json"-H "Duffel-Version: v2"-H "Authorization: Bearer $YOUR_ACCESS_TOKEN"-d '{"data": {"amount": "106.00","currency": "GBP"}}
PaymentIntent with an amount of £106.00. The amount and currency you specify here is the amount and currency that your customer is going to be charged in. It should be calculated as follows: ((offer and services total_amount + markup) x foreign exchange rate) / (1 - Duffel Payments fee).Offer and services total amount: this is the total cost of the flight plus any extra services without Duffel fees. We always present the offer and service(s) total_amount in your Balance currency.
Markup: this is the amount on top of the flight cost that you might charge your customer to cover operational costs and any profits you want to make on the sale of the flight.
Foreign exchange rate: this should only be applied if you are charging your customer in a currency different to the currency of your Balance, the currency of the offers returned by the API. You should use the mid-market exchange rate of the day from your Balance currency to the currency you want to charge your customer in. You should use an external source to get this rate (for example, https://fixer.io/), and add a 2% markup on top of the rate in order to cover the Duffel Payments foreign exchange fee of 2% (
fx rate x 1.02). We recommend that you add slightly more than 2% to account for the fact the FX you use might be slightly different from the one used by Duffel.Duffel Payments fee: is determined based on the card country, it varies if the card is considered domestic or international, an example would be 2.9% or 0.029.
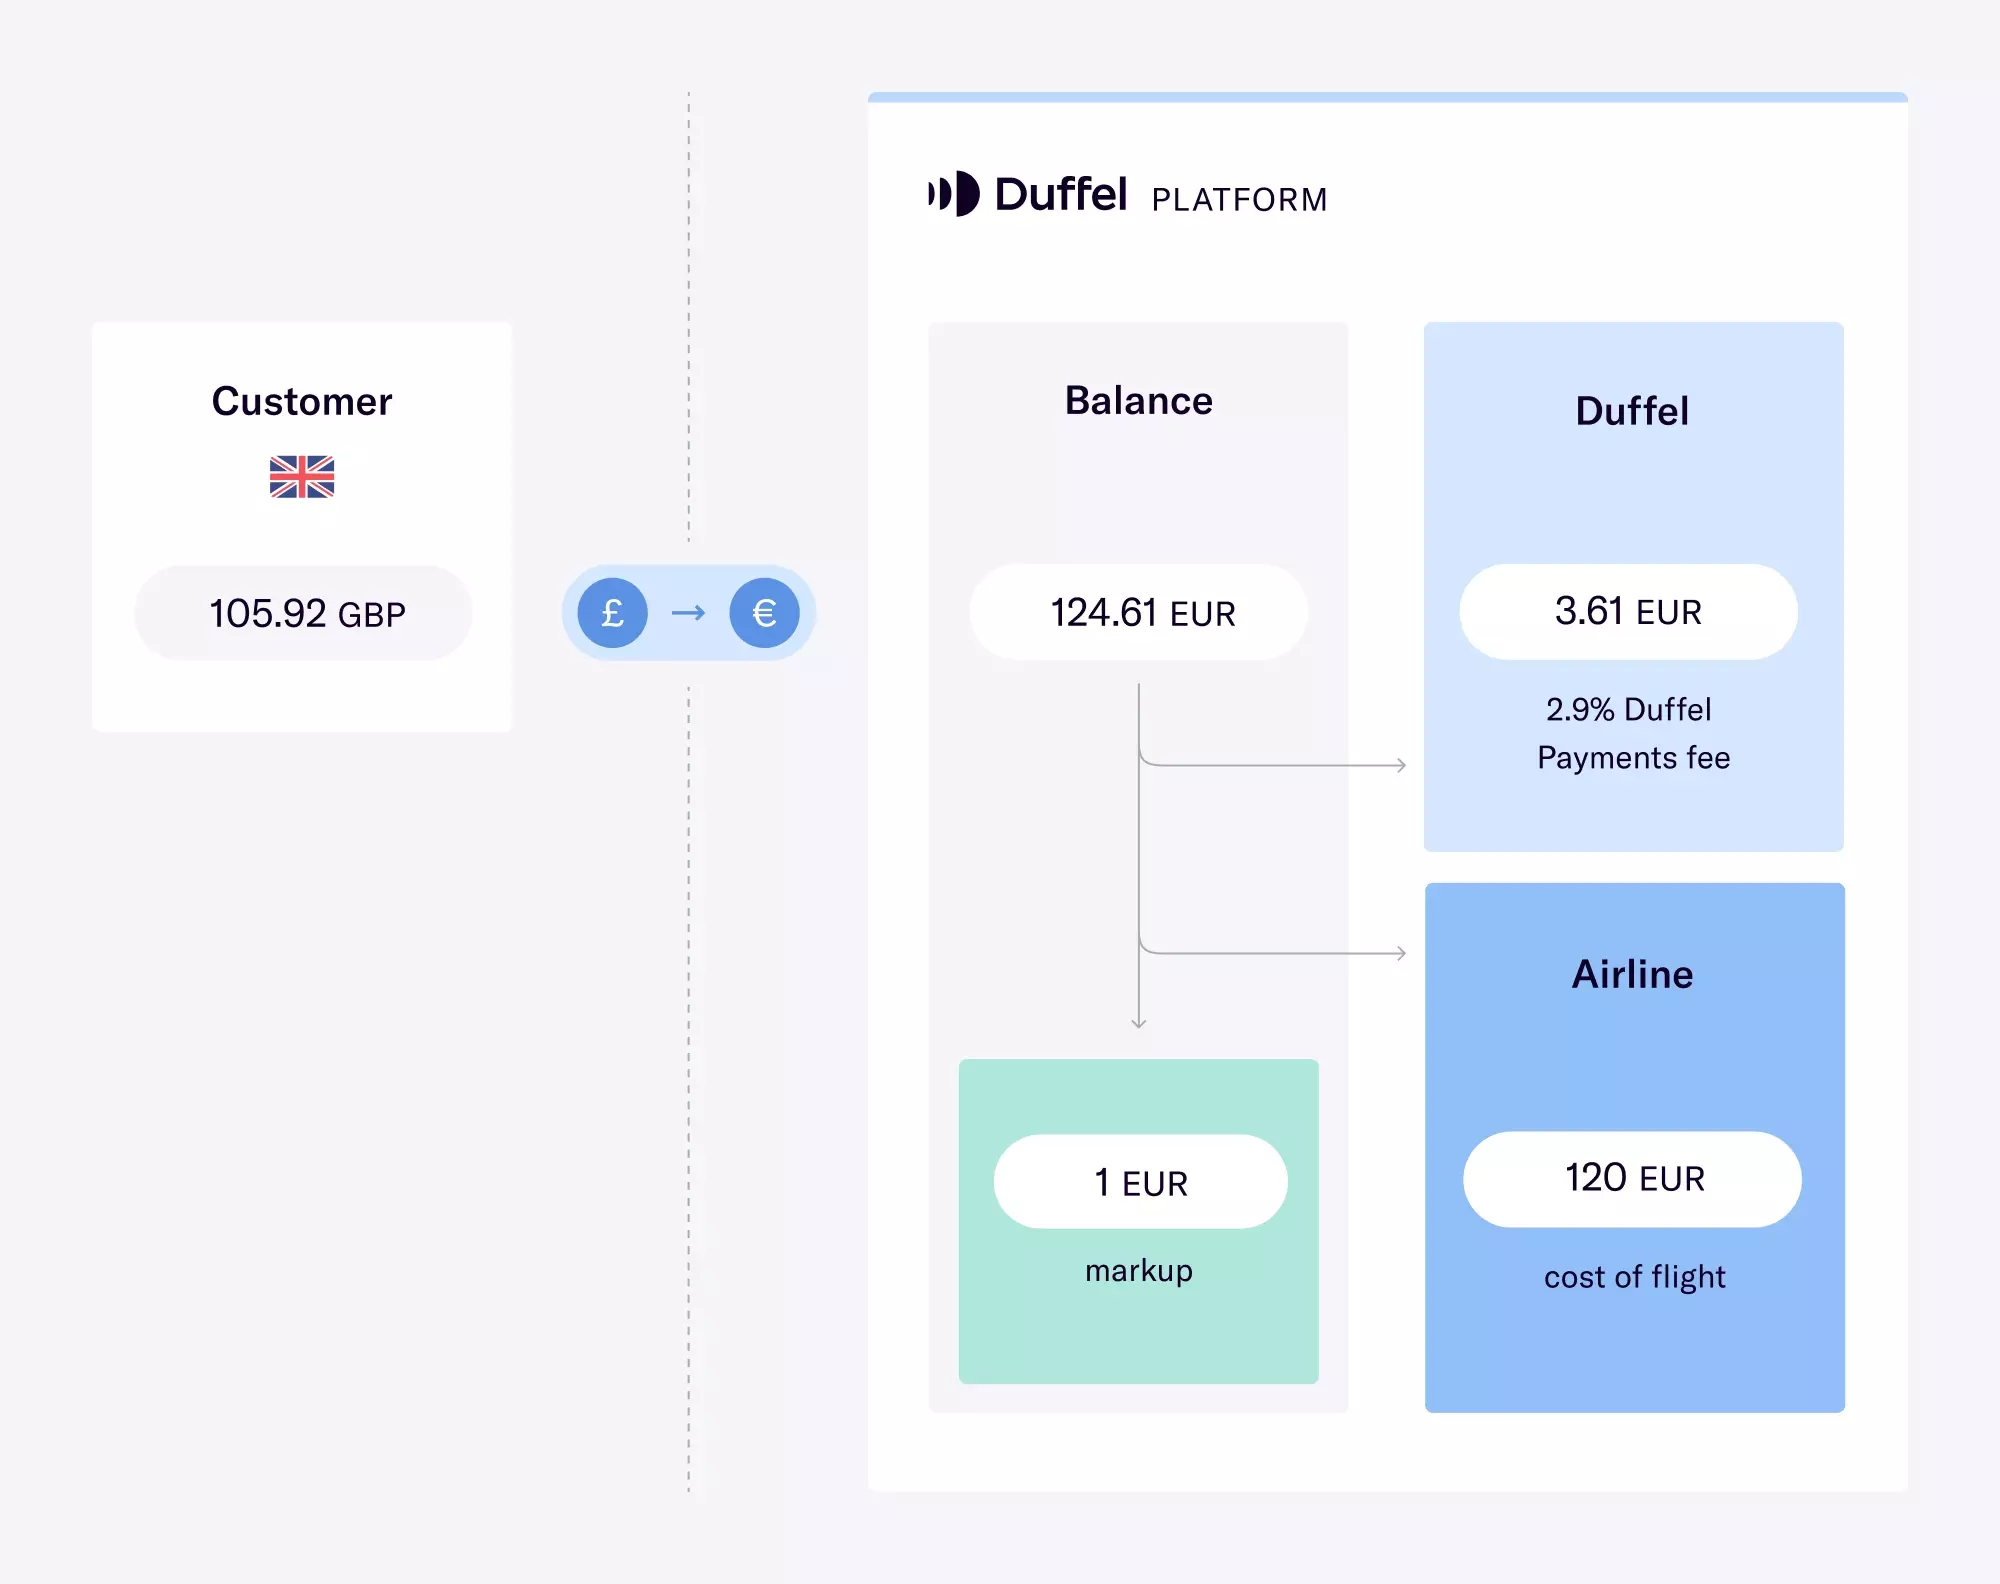
Diagram illustrating flow of funds all the way through from the customer, to the balance, to Duffel and to the airline
((120.00€ + 1.00€) x 0.85) / (1 - 0.029) ~= £105.92.PaymentIntent being created is not tied to the offer being booked. It's just a resource created to represent and record the collection of a payment.Response
JSON
{"data": {"id": "pit_00009hthhsUZ8W4LxQgkjo","live_mode": true,"status": "requires_payment_method","amount": "106.00","currency": "GBP","net_amount": null,"net_currency": null,"fees_amount": null,"fees_currency": null,"client_token": "c2hramgzaGVsbG8gd29ybGQgIyMgZ2lyYWY=","card_network": null,"card_last_four_digits": null,"confirmed_at": null,"created_at": "2020-04-11T15:48:11.642Z","updated_at": "2020-04-11T15:48:11.642Z"}}
PaymentIntent resource. The two fields worth highlighting in this response are the id and the client_token. The client_token will be used in the next step to collect the payment from your customer in the front-end. The id will be used in the confirmation step to confirm the collection of the PaymentIntent, so we recommend you store this information for later use.Collect payment
PaymentIntent created by your back-end server the next step is to use it in your front-end to actually collect the payment.PaymentIntent created in the previous step available to the front-end. We recommend that you create an endpoint in your back-end server that the front-end can use to fetch this information.Note
4242 4242 4242 4242as the card numberany 3 digits as the CVC
any future date as the expiry date
and any ZIP code.
If the payment is successful, the
successfulPaymentHandlerwill be called without any arguments. Along with displaying a page confirming a successful transaction, this handler should call an endpoint in your back-end server to confirm thePaymentIntent- please see the next section.If the payment is unsuccessful, the
errorPaymentHandlerwill be called with the error as an argument. You'd want to indicate to your user that the transaction hasn't gone through. This error will come directly from Stripe, our underlying payment provider. A full list of errors can be found here.
Confirm PaymentIntent
PaymentIntent with the Duffel API, you should use the Confirm a Payment Intent endpoint to do this in your back-end server.PaymentIntent, we'll top-up your Balance with the specified amount, minus the Duffel Payments fees. Once topped-up, it'll be available to create an Order using the Create an order endpoint.Request
Shell
curl -X POST --compressed "https://api.duffel.com/payments/payment_intents/pit_00009hthhsUZ8W4LxQgkjo/actions/confirm"-H "Accept-Encoding: gzip"-H "Accept: application/json"-H "Duffel-Version: v2"-H "Authorization: Bearer $YOUR_ACCESS_TOKEN"
Response
JSON
{"data": {"id": "pit_00009hthhsUZ8W4LxQgkjo","live_mode": true,"status": "succeeded","amount": "106.00","currency": "GBP","net_amount": "121.03","net_currency": "EUR","fees_amount": "3.62","fees_currency": "EUR","client_token": "c2hramgzaGVsbG8gd29ybGQgIyMgZ2lyYWY=","card_network": "visa","card_last_four_digits": "4242","confirmed_at": "2020-04-11T15:52:32.686Z","created_at": "2020-04-11T15:48:11.642Z","updated_at": "2020-04-11T15:48:11.642Z"}}
Create Order
balance since it will have been topped-up with the payment from your customer.id in your new Order's metadata field, to help with things like reconciliation.Request
Shell
curl -X POST --compressed "https://api.duffel.com/air/orders"-H "Accept-Encoding: gzip"-H "Accept: application/json"-H "Content-Type: application/json"-H "Duffel-Version: v2"-H "Authorization: Bearer $YOUR_ACCESS_TOKEN"-d '{"data": {"type": "instant","selected_offers": ["off_00009htYpSCXrwaB9DnUm0"],"payments": [{"type": "balance","amount": "120.00","currency": "EUR"}],"metadata": {"payment_intent_id": "pit_00009hthhsUZ8W4LxQgkjo"}"passengers": [...]}}
Response
JSON
{"data": {"id": "ord_00009htYpSCXrwaB9DnUm1",// ..."metadata": {"payment_intent_id": "pit_00009hthhsUZ8W4LxQgkjo"}}}