Integrating the Duffel Assistant
Note
About
Assistant overview
A trip management interface
Connection to Duffel's travel support team and API-driven support resolution
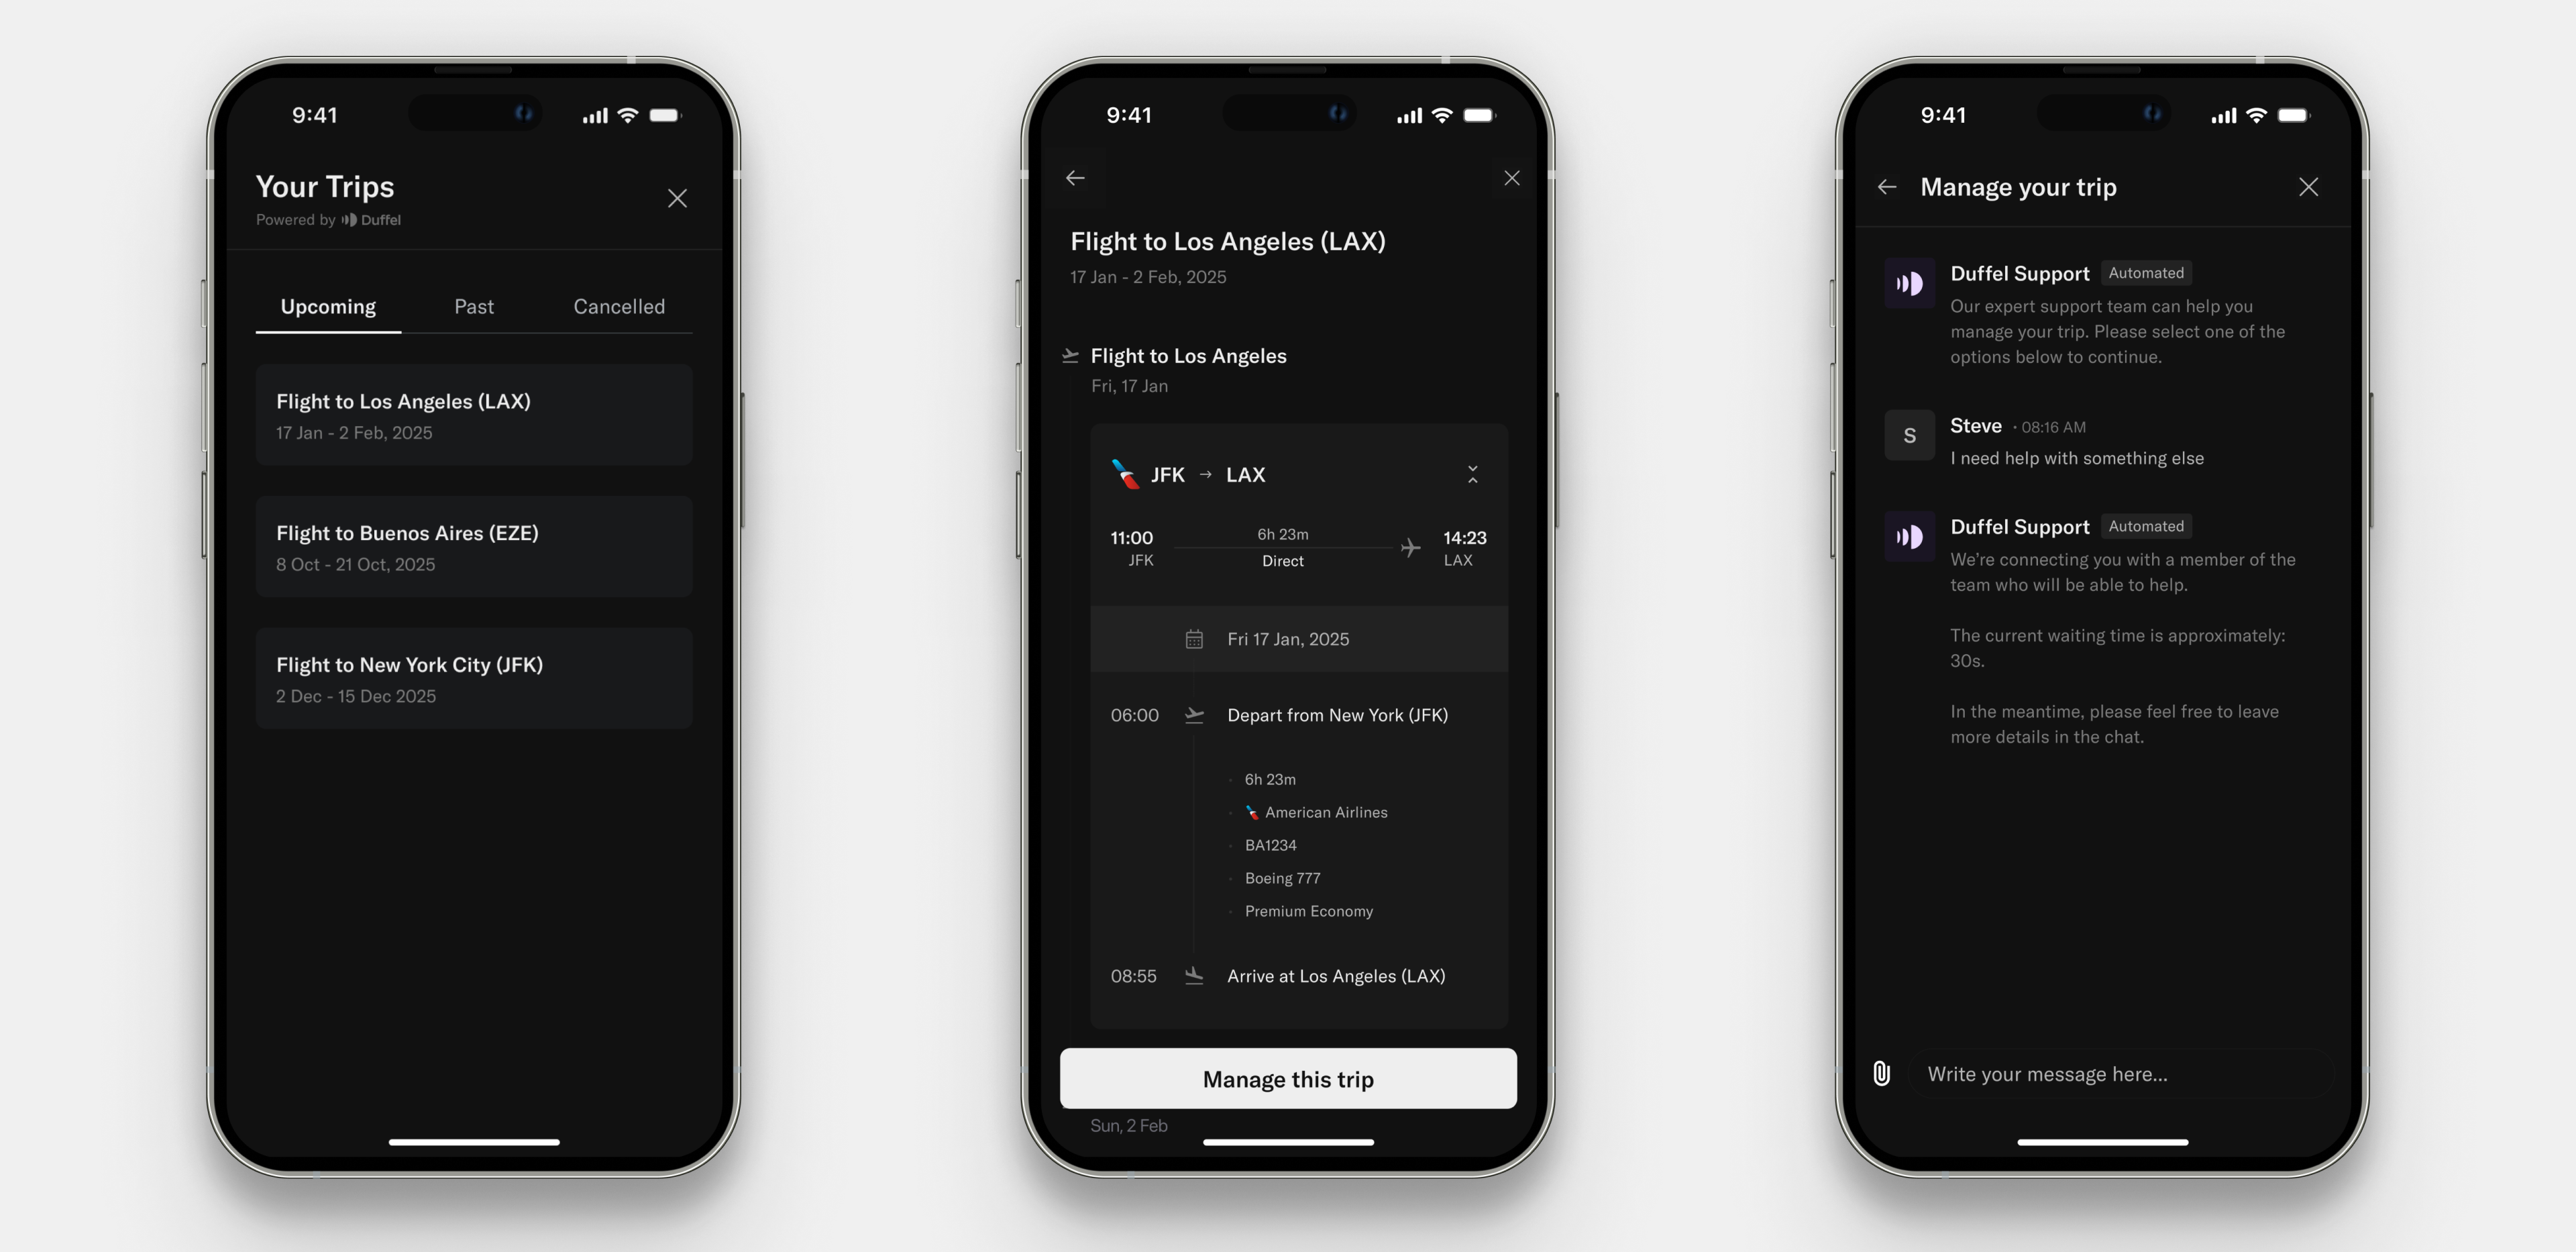
Screenshots of the pages of the Duffel Assistant
Integration options
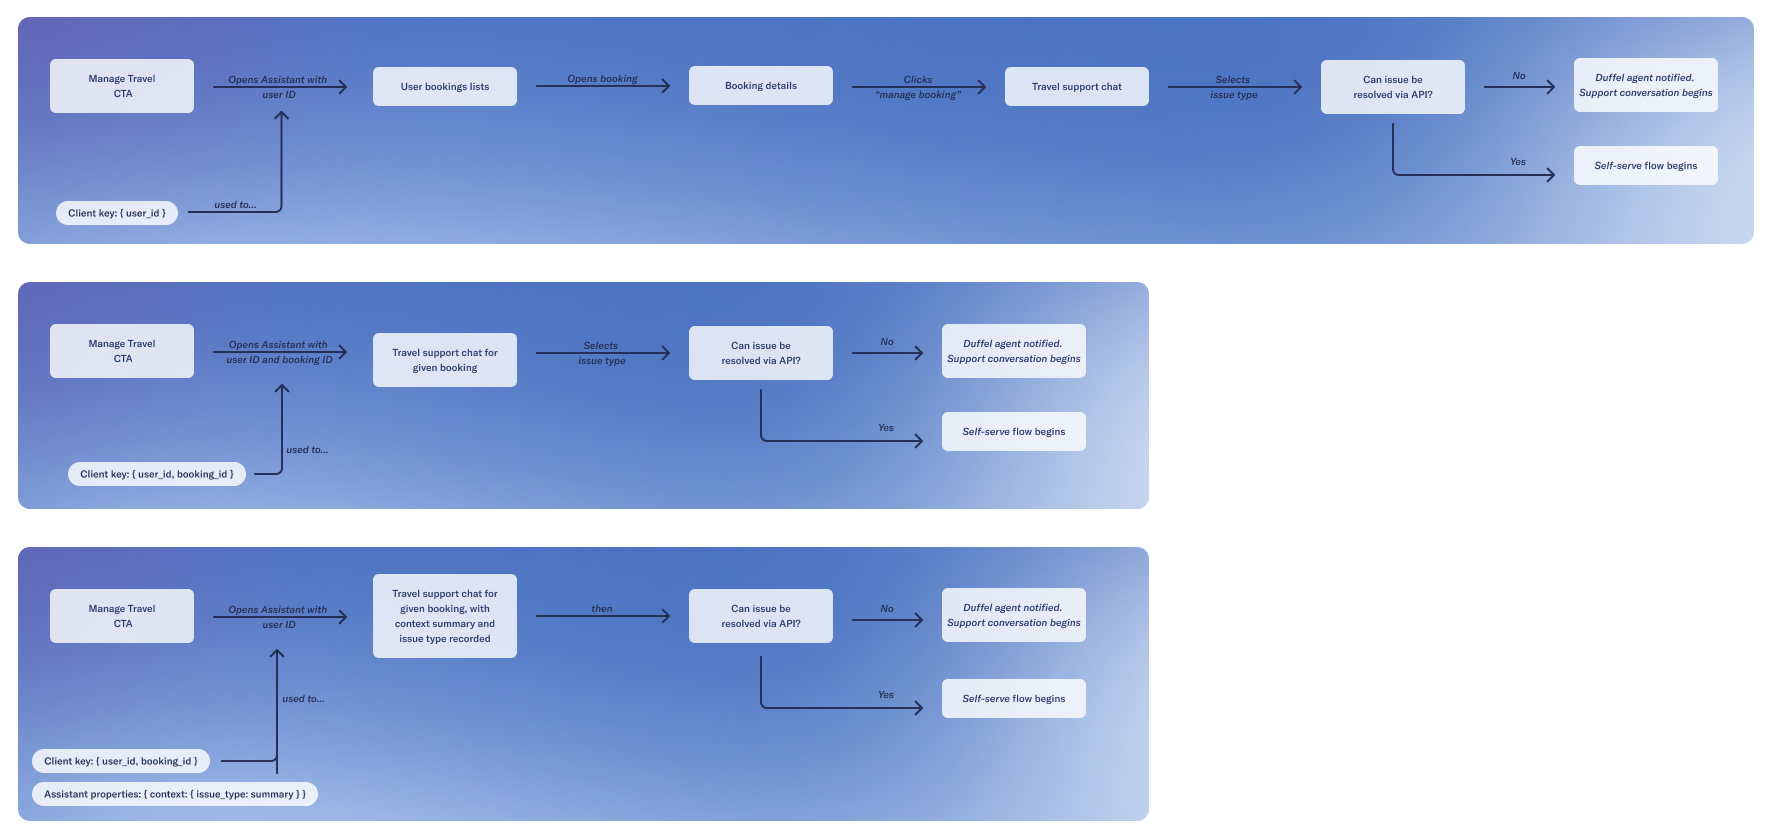
Diagram of the different integration options for the Duffel Assistant
Quick start
Load script
HTML
<scripttype="text/javascript"src="http://assets.duffel.com/assistant/custom-element.js"></script>
Render custom element
HTML
<duffel-assistant></duffel-assistant>
Open assistant
openDuffelAssistant and give it a client key to authenticate the component usage. You can learn about how to retrieve the client key below.React
openDuffelAssistant({clientKey:'fixture_eyJhbGciOiJIUzI1NiJ9.eyJ1c2VyX2lkIjoiaWN1XzEyMyJ9.AEC4nHMvFuOrCljQ1guQz-Sw53GsP4JPiY1N2OLtnpI',})
Pre-requisites
Customer users
Client key
JSON
{ "data": { "user_id": "icu_..." } }
Showing user trips
Generate a client key for your user
Share the client key with your front-end
Load assistant script
Render the custom element
Call function to open the assistant
React
// server.tsimport express from 'express'import { readFile } from 'fs/promises'import { dirname, resolve } from 'path'const app = express()const port = 3000const DUFFEL_API_TOKEN = '' // TODO: Add your API token hereconst USER_ID = '' // TODO: Add your user ID hereconst HTML_FILE_PATH = resolve(__dirname, './index.html')async function getHTML() {return await readFile(HTML_FILE_PATH, {encoding: 'utf-8',})}async function getComponentClientKey(user_id: string) {const response = await fetch(`https://api.duffel.com/identity/component_client_keys`,{method: 'POST',headers: {'Duffel-Version': 'v1','Accept-Encoding': 'gzip',Accept: 'application/json','Content-Type': 'application/json',Authorization: `Bearer ${DUFFEL_API_TOKEN}`,},body: JSON.stringify({ data: { user_id } }),})const { data } = await response.json()return data.component_client_key}app.get('/', async (_req, res) => {try {// STEP 1: Generate a client key for your userconst componentClientKey = await getComponentClientKey(USER_ID)const template = await getHTML()res.writeHead(200)// STEP 2: Share the client key with your front-endres.end(template.replace('__COMPONENT_CLIENT_KEY__', componentClientKey))} catch (error) {console.error(error)res.writeHead(500)res.end((error as Error).message)}})app.listen(port, () => {console.log(`Listening on port ${port}`)})
HTML
// index.html<html lang="en"><head><meta charset="UTF-8" /><meta name="viewport" content="width=device-width, initial-scale=1.0" /><title>Traveller support integration example</title></head><body style="height: 100vh"><h1>Traveller support integration example</h1><button id="open-support" onclick="openSupport()">Open support</button><!-- STEP 4: Render the custom element --><duffel-assistant></duffel-assistant></body><!-- STEP 3: Load assistant script --><scripttype="text/javascript"src="https://assets.duffel.com/assistant/custom-element.js"></script><script type="text/javascript">window.addEventListener('load', () => {window.openSupport = () => {// SETP 4: Call function to open the assistantopenDuffelAssistant({clientKey: '__COMPONENT_CLIENT_KEY__',})}})</script></html>
Conversation history
Assistant for single resource
Client key for resource
JSON
{ "data": { "user_id": "icu_...", "order_id": "ord_..." } }
JSON
{ "data": { "user_id": "icu_...", "booking_id": "bok_..." } }
order_id or booking_id gives the Assistant resource-specific context. The traveller will still see the shared conversation history for that Customer User, even if they open the Assistant from a different order or booking.Opening the assistant
openDuffelAssistant function with the client key generated for the user and resource pair.React
openDuffelAssistant({ clientKey: '...' })
issueType parameter. Allowed values are *cancellation*, *change* or *other*.React
openDuffelAssistant({ clientKey: '...', context: { issueType: 'other' } })
Content Security Policy
| Directive | URL | Reason |
|---|---|---|
script-src | https://assets.duffel.com | Load Duffel Assistant's custom JavaScript file. |
style-src | https://assets.duffel.com | Load Duffel Assistant's custom CSS for the Assistant component. |
style-src | https://cdn.jsdelivr.net | Load CSS styles for the chat provider (Stream)'s React components. |
frame-src | https://assets.duffel.com | Embed the Duffel Assistant iframe in the page. |
connect-src | https://assets.duffel.com | Enables the browser to use the .map.js files for the Assistant custom element. |
connect-src | https://api.duffel.com | Enable HTTP requests made by the Duffel Assistant iframe. |
connect-src | https://chat.stream-io-api.com | Allow HTTP requests for chat functionalities via chat provider's API. |
connect-src | wss://chat.stream-io-api.com/connect | Allow WebSocket connections for real-time chat updates. |
img-src | https://dublin.stream-io-cdn.com | Load image and file assets for the chat service. |
default-src | 'self' | Restrict loading of all other resources to the same origin by default. |
Notifying users of new support messages
Webhook
assistant.conversation.updated to be notified when a new message is sent to the assistant.
The webhook will contain the following data:JSON
{"data": {"user_id": "icu_...","resource_id": "ord_..."}}
Client side "new message" event
For the Web:
JavaScript
window.addEventListener('message', (event) => {if (event.data.type === 'duffel-assistant-new-message') {const { userId, resourceId } = event.dataconsole.log(`New message received for user: ${userId} and resource: ${resourceId}`)// notify your user that new messages have been received.// userId and resourceId will be available to you in the event data.}})
For React Native:
React
<DuffelAssistantonNewMessage={(newMessageEvent) => {const { userId, resourceId } = newMessageEventconsole.log(`New message received for user: ${userId} and resource: ${resourceId}`)// notify your user that new messages have been received.// userId and resourceId will be available to you in the event data.}}/>
Passing in context
context props.
This context will be made available to our support team to enable quicker resolutions, prevent conflicting advice and reduce duplicated questions.
The summary you provide will be shown to our travel support agents when they pick up the chat.
You will also need to provide an issueType ("cancellation", "change" or "other").React
openDuffelAssistant({clientKey,context: {summary:'The traveller wants to change the dates of their stay to one week later',issueType: 'change',},})
React
<DuffelAssistantisOpen={isDuffelAssistantOpen}onClose={() => setIsDuffelAssistantOpen(false)}clientKey="<USER_CLIENT_KEY>"context={{summary: 'This traveller needs their name corrected on the booking',issueType: 'other',}}/>
Minimising the Assistant
showMinimiseButton prop, to display a minimise button next to the close button. When the user clicks on the minimise button,
the assistant will post a message to your page with type duffel-assistant-minimise. You can listen for this message to differentiate between the user choosing to close vs minimise
and render the appropriate UI.React
// Open the assistant with the minimise buttonopenDuffelAssistant({clientKey,showMinimiseButton: true,})// Listen for the minimise messagewindow.addEventListener('message', (event) => {if (event.data.type === 'duffel-assistant-minimise') {// The Assistant iframe will be hidden and you may use this callback to render the UI inidicating it has been minimised.console.log('Assistant minimised')}})
React
<DuffelAssistantisOpen={isDuffelAssistantOpen}clientKey="<USER_CLIENT_KEY>"showMinimiseButton={true}onMinimise={() => {setIsMinimised(true)setIsDuffelAssistantOpen(false)}}onClose={() => setIsDuffelAssistantOpen(false)}/>
Enabling phone support [Preview]
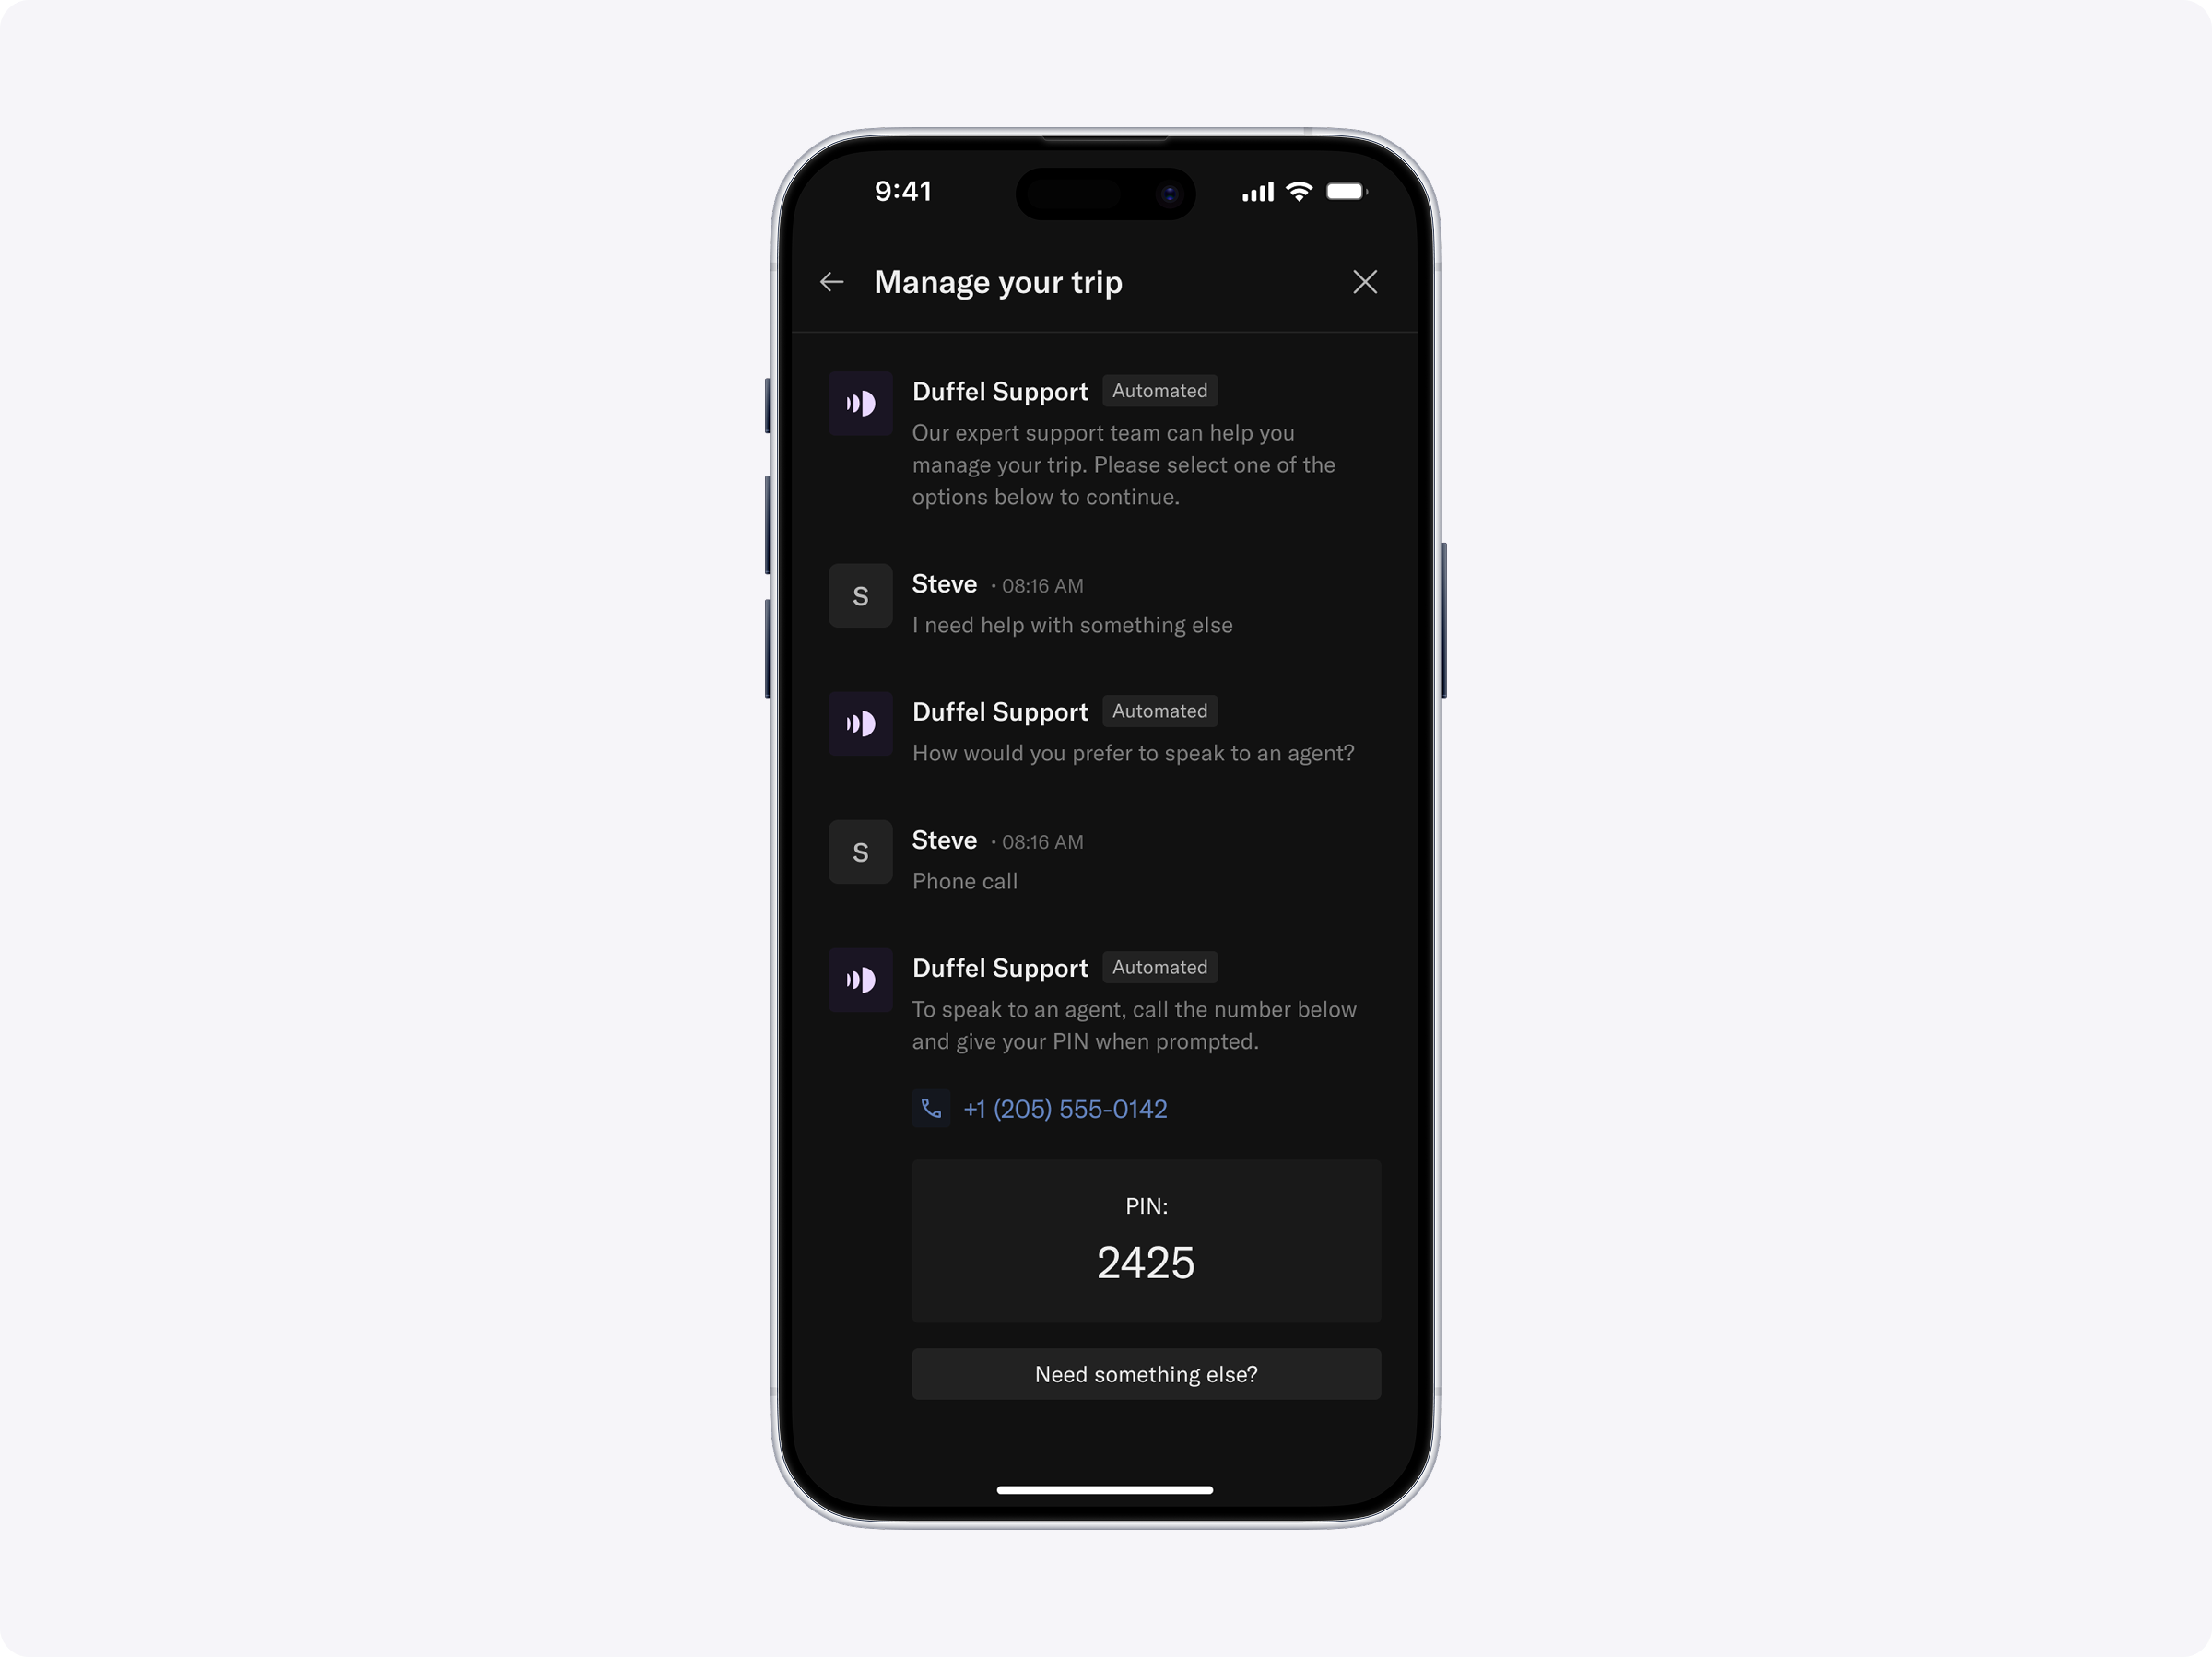
Screenshot of phone support initiated through Duffel Assistant
supportChannels when opening the Assistant:React
openDuffelAssistant({clientKey: '...',supportChannels: {chat: true,phone: true,},})
We do not support phone only, so when using
supportChannels,chatmust be set totrue. Ifchatis set tofalse, the Assistant will fail to render and throw an error message back to the application.If phone support is not enabled for your organisation, the Assistant will continue with chat only.
If
supportChannelsis not provided, the Assistant will continue to only use chat as the support channel.When a traveller chooses phone, the Assistant will show a phone number to call and a temporary PIN to quickly authenticate with a support agent.